For those having problems in upgrading or reformatting their computers, check if your CPU has a built-in HDD. When you check your system it will show as unallocated space in the the HDD. In reality, it is a built-in hard drive in the motherboard or HDD where it has files for the OS of the CPU. This is common with branded computers.
The branded CPUs have their own Windows OS that would have been arranged with Microsoft without necessarily having keys or codes to activate them. Microsoft online will immediately recognize an operating system they have assigned to a manufacturer.
What this manufacturers have not realized is that their computers will be difficult to reformat in the event it is required. They have some files that are not common for market sold OS. When reformatting the market Windows OS might just fail to complete the reformat because it will need drivers only available to the manufacturer.
Sunday, July 7, 2013


Tuesday, February 26, 2013
CMOS error
The trouble with many motherboards of computers is having or showing CMOS error whenever you switch on your PC. It is frustrating when you know your PC is less than a year old and already having that problem.
 Manufacturers of motherboards, especially those made in China, have that problem. Usually it should just be updating the BIOS and everything should be alright. But, no, it's not that way anymore. The problem could either be the 'botherboard' needs exactly the 3-volts of the CMOS battery and no less, or, the CMOS battery provides less than 3 volts.
It happened to an EMAXX motherboard and I thought replacing the CMOS battery solved it. The solution was only good for one day. It was the same thing on the second day showing CMOS error but there was actually none. The earlier errors before replacement was the date and time. Now there are no actual errors. Just press on F10 and all is good.
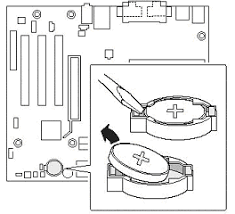
The issue is, if the AVR is turned off, it seems the CMOS battery no longer does the job it needs to do. It does not save the basic info it needs to start the CPU normally. So, if you do not want to getting into BIOS every start up, leave the AVR on. That will save precious minutes of going over BIOS and starting the computer.
 Manufacturers of motherboards, especially those made in China, have that problem. Usually it should just be updating the BIOS and everything should be alright. But, no, it's not that way anymore. The problem could either be the 'botherboard' needs exactly the 3-volts of the CMOS battery and no less, or, the CMOS battery provides less than 3 volts.
It happened to an EMAXX motherboard and I thought replacing the CMOS battery solved it. The solution was only good for one day. It was the same thing on the second day showing CMOS error but there was actually none. The earlier errors before replacement was the date and time. Now there are no actual errors. Just press on F10 and all is good.
The issue is, if the AVR is turned off, it seems the CMOS battery no longer does the job it needs to do. It does not save the basic info it needs to start the CPU normally. So, if you do not want to getting into BIOS every start up, leave the AVR on. That will save precious minutes of going over BIOS and starting the computer.
Saturday, December 29, 2012
Windows 7 boot failure fix
Windows 7 has been a pain in the neck ever since we tried using it at our internet shop. We formatted back all our operating system to Windows XP as we did not have that much of a problem with XP, except for one computer. Two days ago, this computer started having boot failures until it would no longer boot.
 We have tried reformatting it back with the Windows 7 CD installer but never succeeded. It had so many excuses. The remedies online were also tried but none of them worked. We have a SATA HDD on the CPU and also with another computer that had XP as operating system.
For fear that the 500 Gig SATA might have gone defective, I installed it on the CPU that has a 250 Gig SATA with Win XP OS. When I started the one with XP, it went to CheckDisk mode on the 500 Gig SATA. It corrected all the disk errors.
 When I installed back the 500 Gig SATA to its original computer it booted normally with Windows 7. It first showed "Launch Repair" with "Open Windows normally" and I opted for the latter. Yes, it booted normally with Windows 7 with no problem at all. This simply shows that Windows XP is far superior to Windows 7 as it was able to fix what the Windows 7 installer CD could not.
I hope that Microsoft will continue supporting Windows XP as it shows to be a support for succeeding Windows OS that could not fix their own problems.

 We have tried reformatting it back with the Windows 7 CD installer but never succeeded. It had so many excuses. The remedies online were also tried but none of them worked. We have a SATA HDD on the CPU and also with another computer that had XP as operating system.
For fear that the 500 Gig SATA might have gone defective, I installed it on the CPU that has a 250 Gig SATA with Win XP OS. When I started the one with XP, it went to CheckDisk mode on the 500 Gig SATA. It corrected all the disk errors.
 When I installed back the 500 Gig SATA to its original computer it booted normally with Windows 7. It first showed "Launch Repair" with "Open Windows normally" and I opted for the latter. Yes, it booted normally with Windows 7 with no problem at all. This simply shows that Windows XP is far superior to Windows 7 as it was able to fix what the Windows 7 installer CD could not.
I hope that Microsoft will continue supporting Windows XP as it shows to be a support for succeeding Windows OS that could not fix their own problems.
Tuesday, November 27, 2012
How to Start Your Own Car Repair Shop
How to Start Your Own Car Repair Shop - A good business to start with minimal capital is an auto body repair and repainting shop. What is important here is good knowledge with some hands-on experience. A market start-up for the business will be like family, friends or associates, especially if exceptional jobs on their cars are done.
Word-of-mouth marketing is an essential part of this business to be successful. Tie-ups with car body part and paint material suppliers will also be a good strategy to gain more customers.
Word-of-mouth marketing is an essential part of this business to be successful. Tie-ups with car body part and paint material suppliers will also be a good strategy to gain more customers.
Saturday, November 17, 2012
War Commander FB - fast unit repairs at no cost
The War Commander game at Facebook has earned a big number of enthusiasts. The enthusiasm though is lost for some because of hours of repair time on damaged units. To make instant repairs it will cost money or Facebook credits and many would not want to spend money on playing war games like War Commander.
There is a little trick to shorten the repair time of damaged units. When repair time is less than 5 minutes, repair is free and instant. Riflemen and heavy gunners could be repaired instantly in groups of five or more. A pair Rocket Launcher and Flamethrower can likewise be instantly repaired. Others will take 6 to 9 minutes individually to repair and all you have to do is wait until the last 5 minutes to instantly repair them.
What you need to do is set up a platoon and name it "Repairs". Put in units one at a time that require repair time of less than 5 minutes to repair to make it instant. Move damage units to the barracks so you can proceed repairing them one after another. It takes almost or much less than half the time of standard platoon repairs at no cost at all. You will tend to like War Commander more because you actively participate in quick repairs of units.
There is a little trick to shorten the repair time of damaged units. When repair time is less than 5 minutes, repair is free and instant. Riflemen and heavy gunners could be repaired instantly in groups of five or more. A pair Rocket Launcher and Flamethrower can likewise be instantly repaired. Others will take 6 to 9 minutes individually to repair and all you have to do is wait until the last 5 minutes to instantly repair them.
What you need to do is set up a platoon and name it "Repairs". Put in units one at a time that require repair time of less than 5 minutes to repair to make it instant. Move damage units to the barracks so you can proceed repairing them one after another. It takes almost or much less than half the time of standard platoon repairs at no cost at all. You will tend to like War Commander more because you actively participate in quick repairs of units.
Thursday, August 9, 2012
How to fix some CPU problems
Many CPU or computer desktop problems can be fixed by simple re-seating and changing of slots. Most motherboards will have 2 to 4 slots for its RAM. Same is true for GPU or video card PCI-e slots. Some problems that can be fixed are like:
If it is not the RAM cards, re-seat the GPU or video graphics card. If it still does not work, test the graphics card on a different CPU compatible with it. You should be able to tell then if it is the graphics card that is at fault or not.
Lastly, check the heat sink and fan of the processor. Chances are dirt and dust have accumulated causing the processor to overheat. Follow instructions from the manual on how to properly remove the fan and/or heat sink. To clean the assembly, use a soft bristle paint brush to get rid of the dirt. If the processor is exposed as with AMD processors, you should be able to see if silicon paste needs to be added for better cooling.
Take time also to inspect the PSU for dirt accumulation. It will also need to be cleaned gently with a paint brush. Take extra precaution in cleaning as some parts of the PSU still hold some high voltage that could give an unpleasant shock or even a bad burn.
I am currently handling and maintaining 12 desktops and 2 laptops at our internet shop and the above were the frequent problems and solutions.
- Monitor suddenly does not have any display.
- CPU starts then shuts down or restarts after being used for a short while.
- CPU starts but does not show to boot and monitor does not have any display.
- CPU shows error or BSOD shows or freezes on boot up.
If it is not the RAM cards, re-seat the GPU or video graphics card. If it still does not work, test the graphics card on a different CPU compatible with it. You should be able to tell then if it is the graphics card that is at fault or not.
Lastly, check the heat sink and fan of the processor. Chances are dirt and dust have accumulated causing the processor to overheat. Follow instructions from the manual on how to properly remove the fan and/or heat sink. To clean the assembly, use a soft bristle paint brush to get rid of the dirt. If the processor is exposed as with AMD processors, you should be able to see if silicon paste needs to be added for better cooling.
Take time also to inspect the PSU for dirt accumulation. It will also need to be cleaned gently with a paint brush. Take extra precaution in cleaning as some parts of the PSU still hold some high voltage that could give an unpleasant shock or even a bad burn.
I am currently handling and maintaining 12 desktops and 2 laptops at our internet shop and the above were the frequent problems and solutions.
Tuesday, July 24, 2012
How to Use Silicon paste
Processors and heat sink fans will always need to have Silicon paste applied in between them when being installed. After dis-assembly for cleaning, you will find the paste between to have hardened and have breaks, some stay on the processor and others stick to the heat sink. These will have to removed and the surfaces cleaned well with a cotton bud dipped in rubbing alcohol.
When Silicon paste is not applied during re-assembly, chances are the computer will turn off on its own in a short while. This is because the processor has heated up and can not be cooled down by the heat sink fan.
In applying Silicon paste, it should be well spread out evenly on the surface of the processor. About a millimeter thin film of the paste should do the work to help the heat sink cool down the processor. While too much paste can drip down the processor and could ruin some of parts of the computer motherboard.
When Silicon paste is not applied during re-assembly, chances are the computer will turn off on its own in a short while. This is because the processor has heated up and can not be cooled down by the heat sink fan.
In applying Silicon paste, it should be well spread out evenly on the surface of the processor. About a millimeter thin film of the paste should do the work to help the heat sink cool down the processor. While too much paste can drip down the processor and could ruin some of parts of the computer motherboard.
Tuesday, July 17, 2012
How to make printer cartridge recognized
Almost all, if not all, late model printer cartridges have the print heads and contacts integrated in them. So, if you replace an empty cartridge not only do you get a new fully inked one with a new set of contacts and print head. Unlike earlier models, the printer heads were part of the printer assembly and not in the cartridges themselves. Once worn out, most of the time the print head could not be replaced.

With the printer cartridges now, especially those that can be or are being refilled, it is frequent that the printer would show an error that the cartridge is not being recognized or improperly installed. What actually happens is that the contacts are not clean or even smudged by ink. The reason why the printer could not recognize it.
It would be good to try, as remedy, to clean the contacts at the cartridge with cotton by softly wiping it. If the contacts seem dull or have a film over them, use a pencil eraser to clean the contacts much like erasing pencil writing. It often works because contact surface is renewed and can be detected by the printer. This will save a lot of money instead of buying a new printer cartridge.

With the printer cartridges now, especially those that can be or are being refilled, it is frequent that the printer would show an error that the cartridge is not being recognized or improperly installed. What actually happens is that the contacts are not clean or even smudged by ink. The reason why the printer could not recognize it.
It would be good to try, as remedy, to clean the contacts at the cartridge with cotton by softly wiping it. If the contacts seem dull or have a film over them, use a pencil eraser to clean the contacts much like erasing pencil writing. It often works because contact surface is renewed and can be detected by the printer. This will save a lot of money instead of buying a new printer cartridge.
Monday, July 2, 2012
How to remove crankshaft pulley bolt
The usual tool in mind to loosen the bolt of a crankshaft pulley is an impact wrench. Many though have not been successful in using them. There are other methods that can be used to loosen a crankshaft pulley bolt.
One quick way to do it is fit in a socket or box wrench (usually 19mm size) and let the other end rest against something fixed and sturdy where the engine would rotate. The starter then could be 'flicked' several times until the bolt loosens up. Before flicking the starter make sure that the high tension wire to the distributor is removed so the engine will not run.
When doing this method, make sure no one is around or near where the crankshaft pulley is. There is a tendency for the wrench to fly-off when the crankshaft pulley bolt comes loose.
One quick way to do it is fit in a socket or box wrench (usually 19mm size) and let the other end rest against something fixed and sturdy where the engine would rotate. The starter then could be 'flicked' several times until the bolt loosens up. Before flicking the starter make sure that the high tension wire to the distributor is removed so the engine will not run.
When doing this method, make sure no one is around or near where the crankshaft pulley is. There is a tendency for the wrench to fly-off when the crankshaft pulley bolt comes loose.
Tuesday, June 12, 2012
How to cope with Fibromyalgia
Fibromyalgia never came to me as disease I had for more than 30 years now. All the while, I also never thought that I was fighting it that made me overcome the feeling of fatigue when I wake up and the entire body pain that I was experiencing in the early stages of it. Often on days I wake up and feel that way, I suspect that I am about to have flu or had one drink too many the previous night.
What was I doing to overcome body pains and the feeling of fatigue? Here is how to:
Unknown cause of disease and no cure: Fibromyalgia
What was I doing to overcome body pains and the feeling of fatigue? Here is how to:
- When I wake up with that feeling, I force myself out of bed, have a cup of coffee then find something to get busy with.
- Physical activity makes the pain and feeling of fatigue go away.
- I do not take pain killers.
- When walking, especially uphill, to avoid pain in the knee and feeling of having cramps on both legs, I rest every 200 meters or less.
- I have made longer strides when I walk instead of my usual and normal short steps.
- I do not lie down to rest during daytime for more than an hour as it triggers the feeling of fatigue.
Unknown cause of disease and no cure: Fibromyalgia
Thursday, May 31, 2012
Internet connection or network adapter problem
Your computer has been working good and connected to the internet for as long as you know you have been using it. But suddenly, one day, when you switch it on it shows you have no internet connection. What needs to be checked are:
That's what exactly happened to one of my CPUs in our network. I almost concluded that it was a motherboard issue. After some thorough research, I found out that there is a reset button or hole near where the headset is being plugged at the rear of the casing! (Most desktops would have and some might not) All that needs to be done is switch off the CPU, unplug the power cord then press the button for a couple of seconds. After that, plug in the CPU and switch it on. It should have the internet connection again. (TIP: If there is a small hole for the reset, use a paper clip to be inserted in the hole to press on reset.
Another possible cause would be the CMOS is corrupted and needs to be reset. If clearing and resetting does not do the job, check on the CMOS battery, chances are it is already drained and will have to be replaced. Symptoms of a CMOS battery going bad is the CPU time always resets to default whenever the computer is turned on.
- Your cable or wifi connection
- Verify with your ISP if there's anything wrong with their service
- Check on your network adapter for any flaws
That's what exactly happened to one of my CPUs in our network. I almost concluded that it was a motherboard issue. After some thorough research, I found out that there is a reset button or hole near where the headset is being plugged at the rear of the casing! (Most desktops would have and some might not) All that needs to be done is switch off the CPU, unplug the power cord then press the button for a couple of seconds. After that, plug in the CPU and switch it on. It should have the internet connection again. (TIP: If there is a small hole for the reset, use a paper clip to be inserted in the hole to press on reset.
Another possible cause would be the CMOS is corrupted and needs to be reset. If clearing and resetting does not do the job, check on the CMOS battery, chances are it is already drained and will have to be replaced. Symptoms of a CMOS battery going bad is the CPU time always resets to default whenever the computer is turned on.
Monday, August 1, 2011
Home made temporary level
Times come when you need to level a pool table, a stove or anything that needs to be leveled. They seem to look awkward when tilted to one side. It is irritating to see it is obvious for liquid to flow to just one side or higher on one side in a glass or container.
To make surfaces or things sit squarely flat horizontally, a carpenter's leveling tool is used for that. It is not common household tool so chances are you would not have one at home. How to make a home made temporary one is really easy. Take a glass or plastic jar with a cap. Draw a line about an inch high from the bottom around the jar. Put water in the jar up to the line you have drawn.
 By setting the jar in the middle what you want to level, you will see what side needs to be elevated. The lower side will show water in the jar to be higher than the line. That should solve your problem on a surface that needs to be leveled.
To make surfaces or things sit squarely flat horizontally, a carpenter's leveling tool is used for that. It is not common household tool so chances are you would not have one at home. How to make a home made temporary one is really easy. Take a glass or plastic jar with a cap. Draw a line about an inch high from the bottom around the jar. Put water in the jar up to the line you have drawn.
 By setting the jar in the middle what you want to level, you will see what side needs to be elevated. The lower side will show water in the jar to be higher than the line. That should solve your problem on a surface that needs to be leveled.
 Sunday, July 24, 2011
Small Frying pan handle remedy
Our smaller stainless steel frying pan is used daily - the reason why its handle gave in earlier. There was no heat-resistant stub that remained as it all crumbled to tiny bits. Anyway it is not being used for prolonged cooking and mostly for heating food or frying eggs.

When I made or fixed the handle, I still had an oxy-acetylene torch set. Instead of doing a full metal weld, I did a bronze weld to preserve the properties of stainless steel. The extended handle was fashioned from a piece of flat stainless steel "folded" to wrap around the original handle stub. This resulted to a handle that does not get heated too much for normal handling.
Do this only if you are familiar with the process as bronze welding require the use of flux for proper adherence of the bronze to the surfaces involved.

When I made or fixed the handle, I still had an oxy-acetylene torch set. Instead of doing a full metal weld, I did a bronze weld to preserve the properties of stainless steel. The extended handle was fashioned from a piece of flat stainless steel "folded" to wrap around the original handle stub. This resulted to a handle that does not get heated too much for normal handling.
Do this only if you are familiar with the process as bronze welding require the use of flux for proper adherence of the bronze to the surfaces involved.
Large Frying Pan broken handle
Cook wares outlast their handles most of the time. Like our good large stainless steel frying pan, it would have been outright dumb to dispose of it just because of a broken handle. Fortunately, the stub handle was long enough to do some remedy to attach something to it.
 So even with an aluminum square tube, that fits exactly to the heat resistant handle stub, it was just a matter of how to fix it to the stub. As the stub has also lost its stainless steel rivet, I replaced it with aluminum rivets to size. Then I drilled a hole on through the aluminum tube and stub then bonding them with a single rivet. It's been more than 10 years now and the frying pan still is in good use for us at home.
 So even with an aluminum square tube, that fits exactly to the heat resistant handle stub, it was just a matter of how to fix it to the stub. As the stub has also lost its stainless steel rivet, I replaced it with aluminum rivets to size. Then I drilled a hole on through the aluminum tube and stub then bonding them with a single rivet. It's been more than 10 years now and the frying pan still is in good use for us at home.
How to use Box Wrench as extension
Open-wrenches are often shorter than Box or Closed-Wrenches. The reason is to prevent over forcing the open-wrench in either tightening or loosening bolts and nuts. Doing so could make corners of bolts and nuts rounded and more difficult to work on.
 On some occasions, it is impossible to use a box-wrench in tight spots where only open-wrench can only be inserted but does not have enough length for leverage. A suitable box-wrench of the same size can be used as extension for the open-wrench for more leverage. This can be used to either loosen stubborn bolts and nuts or tighten them. Make sure to use insert the box-wrench properly as shown on the photo.
 On some occasions, it is impossible to use a box-wrench in tight spots where only open-wrench can only be inserted but does not have enough length for leverage. A suitable box-wrench of the same size can be used as extension for the open-wrench for more leverage. This can be used to either loosen stubborn bolts and nuts or tighten them. Make sure to use insert the box-wrench properly as shown on the photo.
Subscribe to:
Posts (Atom)